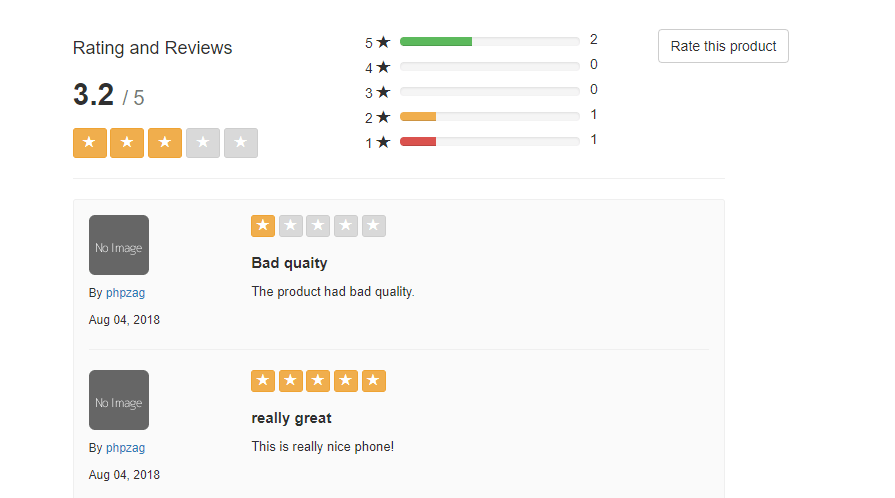
The star rating and review systems are very common in eCommerce websites to allow customers to give reviews on products. The five star rating systems are very popular in which users can rate products by selecting stars from one to five and also give feedback comments. So if you're looking for script to implement rating and review system, then you're here at right place. In this tutorial, you will learn how to develop five start rating and review system using Ajax, PHP and MySQL. We will cover this tutorial in easy steps to create live example of 5 star rating system with Ajax, PHP and MySQL.

As we will cover this tutorial with live example to develop 5 start rating and review system using Ajax, PHP and MySQL, so the major files for this example is following.
Step1: Create Database Table
First we will create MySQL database table item_rating to store rating details and feedback comments.
Step2: Create Rating and Review Form
In index.php file, we will create rating and review form with five start and inputs to save users rating and reviews.
Step3: Rating and Review Form Submit and Save with jQuery Ajax
In rating.js file, we will handle Form submit with jQuery and also handle Form values save functionality by making Aajx request to saveRating.php to save rating details to database table.
Step4: Save Rating and Review into Database Table
Now in saveRating.php file, we will handle functionality to save rating and review details in to MySQL database table item_rating. Here we have hard coded itemId and userId. You can implement it dynamically in your system according to your needs.
Step5: Display Rating and Review Details
In index.php file, we will display users saved rating and review details from database table item_rating with users star rating to display rating star as selected .
You can view the live demo from the Demo link and can download the script from the Download link below.
Demo[sociallocker]Download[/sociallocker]

As we will cover this tutorial with live example to develop 5 start rating and review system using Ajax, PHP and MySQL, so the major files for this example is following.
- index.php
- rating.js
- saveRating.php
Step1: Create Database Table
First we will create MySQL database table item_rating to store rating details and feedback comments.
CREATE TABLE `item_rating` (
`ratingId` int(11) NOT NULL,
`itemId` int(11) NOT NULL,
`userId` int(11) NOT NULL,
`ratingNumber` int(11) NOT NULL,
`title` varchar(255) COLLATE utf8_unicode_ci NOT NULL,
`comments` text COLLATE utf8_unicode_ci NOT NULL,
`created` datetime NOT NULL,
`modified` datetime NOT NULL,
`status` tinyint(1) NOT NULL DEFAULT '1' COMMENT '1 = Block, 0 = Unblock'
) ENGINE=InnoDB DEFAULT CHARSET=utf8 COLLATE=utf8_unicode_ci;
ALTER TABLE `item_rating`
ADD PRIMARY KEY (`ratingId`);
Step2: Create Rating and Review Form
In index.php file, we will create rating and review form with five start and inputs to save users rating and reviews.
<div class="row">
<div class="col-sm-12">
<form id="ratingForm" method="POST">
<div class="form-group">
<h4>Rate this product</h4>
<button type="button" class="btn btn-warning btn-sm rateButton" aria-label="Left Align">
<span class="glyphicon glyphicon-star" aria-hidden="true"></span>
</button>
<button type="button" class="btn btn-default btn-grey btn-sm rateButton" aria-label="Left Align">
<span class="glyphicon glyphicon-star" aria-hidden="true"></span>
</button>
<button type="button" class="btn btn-default btn-grey btn-sm rateButton" aria-label="Left Align">
<span class="glyphicon glyphicon-star" aria-hidden="true"></span>
</button>
<button type="button" class="btn btn-default btn-grey btn-sm rateButton" aria-label="Left Align">
<span class="glyphicon glyphicon-star" aria-hidden="true"></span>
</button>
<button type="button" class="btn btn-default btn-grey btn-sm rateButton" aria-label="Left Align">
<span class="glyphicon glyphicon-star" aria-hidden="true"></span>
</button>
<input type="hidden" class="form-control" id="rating" name="rating" value="1">
<input type="hidden" class="form-control" id="itemId" name="itemId" value="12345678">
</div>
<div class="form-group">
<label for="usr">Title*</label>
<input type="text" class="form-control" id="title" name="title" required>
</div>
<div class="form-group">
<label for="comment">Comment*</label>
<textarea class="form-control" rows="5" id="comment" name="comment" required></textarea>
</div>
<div class="form-group">
<button type="submit" class="btn btn-info" id="saveReview">Save Review</button> <button type="button" class="btn btn-info" id="cancelReview">Cancel</button>
</div>
</form>
</div>
</div>
Step3: Rating and Review Form Submit and Save with jQuery Ajax
In rating.js file, we will handle Form submit with jQuery and also handle Form values save functionality by making Aajx request to saveRating.php to save rating details to database table.
$('#ratingForm').on('submit', function(event){
event.preventDefault();
var formData = $(this).serialize();
$.ajax({
type : 'POST',
url : 'saveRating.php',
data : formData,
success:function(response){
$("#ratingForm")[0].reset();
window.setTimeout(function(){window.location.reload()},1000)
}
});
});
Step4: Save Rating and Review into Database Table
Now in saveRating.php file, we will handle functionality to save rating and review details in to MySQL database table item_rating. Here we have hard coded itemId and userId. You can implement it dynamically in your system according to your needs.
<?php
include_once("db_connect.php");
if(!empty($_POST['rating']) && !empty($_POST['itemId'])){
$itemId = $_POST['itemId'];
$userID = 1234567;
$insertRating = "INSERT INTO item_rating (itemId, userId, ratingNumber, title, comments, created, modified) VALUES ('".$itemId."', '".$userID."', '".$_POST['rating']."', '".$_POST['title']."', '".$_POST["comment"]."', '".date("Y-m-d H:i:s")."', '".date("Y-m-d H:i:s")."')";
mysqli_query($conn, $insertRating) or die("database error: ". mysqli_error($conn));
echo "rating saved!";
}
?>
Step5: Display Rating and Review Details
In index.php file, we will display users saved rating and review details from database table item_rating with users star rating to display rating star as selected .
<div class="row">
<div class="col-sm-7">
<hr/>
<div class="review-block">
<?php
$ratinguery = "SELECT ratingId, itemId, userId, ratingNumber, title, comments, created, modified FROM item_rating";
$ratingResult = mysqli_query($conn, $ratinguery) or die("database error:". mysqli_error($conn));
while($rating = mysqli_fetch_assoc($ratingResult)){
$date=date_create($rating['created']);
$reviewDate = date_format($date,"M d, Y");
?>
<div class="row">
<div class="col-sm-3">
<img src="image/profile.png" class="img-rounded">
<div class="review-block-name">By <a href="#">phpzag</a></div>
<div class="review-block-date"><?php echo $reviewDate; ?></div>
</div>
<div class="col-sm-9">
<div class="review-block-rate">
<?php
for ($i = 1; $i <= 5; $i++) {
$ratingClass = "btn-default btn-grey";
if($i <= $rating['ratingNumber']) {
$ratingClass = "btn-warning";
}
?>
<button type="button" class="btn btn-xs <?php echo $ratingClass; ?>" aria-label="Left Align">
<span class="glyphicon glyphicon-star" aria-hidden="true"></span>
</button>
<?php } ?>
</div>
<div class="review-block-title"><?php echo $rating['title']; ?></div>
<div class="review-block-description"><?php echo $rating['comments']; ?></div>
</div>
</div>
<hr/>
<?php } ?>
</div>
</div>
</div>
You can view the live demo from the Demo link and can download the script from the Download link below.
Demo[sociallocker]Download[/sociallocker]
Poeple sometimes not remember to change stars rating system, and write only comments...
Error in query:
Hello, I got this error. Can you help me?